| Author |
Message |
| < 16ga. General Discussion ~ My shotgun "home dent repair" attempt. |
|
 Posted:
Sun May 02, 2010 11:06 am Posted:
Sun May 02, 2010 11:06 am
|

|
|
Joined: 28 Mar 2009
Posts: 31
Location: kansas city
|
|
Hi all,
Been quite a long time since I've been on the board but I just recently got to playing with a repair I thought maybe some of you might be interested in.
However, like all stories, a little background is probably in order. All my life, I've always wanted a quality SXS shotgun similar to the Fox Sterlingworth my dad has. I bought one once for $75 from a pawn shop with a broken stock and a dent in one barrel but it still had the typical Fox "vault door tight" yet "butter smooth" action. The plan was to make my own stock and have the gun reblued/repaired as needed. Lesson learned on that gun? Don't let a gunsmith who doesn't know old double guns work on one no matter how reputable, expensive, beautiful or customized of a rifle he builds. Old shotguns are a whole 'nuther ball game. This fella fixed the dent then threw the barrels in his hot blue tank where they and the ribs ended up laying in pieces after all the solder melted. But hey, he didn't charge me for his work...
Fast forward about 20 years.... I finally happened across another SXS that was in my price range. It's a German Guild gun with only the name Remo on the rib. Krupp barrels, a Suhl action (If I recall correctly. Not sure of the spelling either...) Anyway, with the European style cheekpiece and the stock spec's it fit me better than just about any other gun I've picked up and it was possibly even smoother and just as tight as Dad's Fox. Blueing showed wear and case colors were about gone but man what a gun! Chambers are the European 2 1/2" so ammo would be a little tricky I thought but then the guy in the Cabella's gun room said it should handle low brass 2 3/4" shells just fine. Said he had an old Fox with short chambers and had shot hundreds if not thousands of 2 3/4 shells through it. Cool!
Well.... went and shot the gun the day I bought it and loved it but then noticed the lever sticking, the action hard to open and once reclosed, it was a little loose all of a sudden and I'd only shot half a box. So... back to the store and they say they can fix the gun as that should never have happened. Months later I got it back and it looked like it had had the stock clamped in a vice, screws buggered and the bottom plate put back on crooked. There's more of my bad luck with gunsmiths and doubles... Took it back and showed it to the head honcho in the gun library and he was clearly disgusted and said he'd make it right. I wasn't sure if I wanted their guys working on it again and told him so. Told him I'd planed to eventually do a refinish and have something really nice to pass on to my kids. He came back with the question of "When did you plan to do that?" I wasn't sure but just said "someday". He then took out his card file and gave me a card to a gunsmith that he said worked on his personal guns. A guy who had worked in the Browning custom shop and specialized in double shotguns. He even went so far as to offer that they would pay half for a full restoration and I thought that was pretty fair.
Long story longer...
The gun came back absolutely beautiful. Everything had been redone except the wood. Screws retimed, case colors, barrel blue, back on face, hinge pin, etc etc. The gun was mechanically like brand new.
Back to the range again but with proper 2 1/2" shells and dang what fun! Even had me one of them fancy clay bird throwers that have three legs you shove in the ground, cock and pull a string to throw. Beat the heck out of my usual hold gun in left hand, throw with my right, drop thrower and shoot routine. About a box of shells into the fun, I'd developed a routine where I stood on two of the feet of the thrower to keep it from coming out of the ground, shoot a clay, break open the gun to pull the empties and then reach down, cock the thrower, load it, load the gun, pull the string, shoot and repeat.
Unfortunately for me, at one point when I had pulled my empties and was cocking the thrower, the catch didn't hold properly and just as I let go of the thrower arm, it decided to release and it came flying around and hit the right barrel of my gun which was opened and in my left hand!    @$%!#$!!!!! @$%!#$!!!!!
Made me almost physically sick.
Here's a picture taken today before I started the repair.

Over time, I got over it (sort of) but I always wanted to get it fixed. The day it happened, I called the gunsmith who had done the restoration thinking "this guy I trust to work on it" only to have him say "we don't fix dents".
"Why not????"
"Because NOBODY is ever happy with the results."
"Really?"
"Yup."
"Damn."
So there it sat for about two years. I eventually started shooting it again and had no problem but really wanted to fix it. Did a little reading and research and found the common method was to use a hydraulic mandrel that inserted into the bore and when in position pressure was applied to push the dent back out. However the tool was pretty expensive and I don't have extra cash laying around most of the time... But if you look in the pic above, you will see my solution. I'm a professional industrial mechanic by trade with an aviation background and know several machinists and have access to tools and materials.
Dang, just looked at the clock and saw it's time for me to head to work right now....
I'll continue this later. |
Last edited by dave bulla on Tue May 04, 2010 7:02 am; edited 3 times in total |
|
|
|
|
 |
|
| Posted:
Sun May 02, 2010 7:13 pm
|
|
|
Member

Joined: 08 Nov 2005
Posts: 3438
Location: Illinois
|
|
Looking foward to the rest of the story--Two lessons learned here-1.Don't let a riflesmith work on a double --hard lesson learned. 2. ALWAYS keep those barrels away from things that will hurt them--sometimes easier said than done--Kinda like watching the stock when shooting skeet --Hope the gun is back up and running soon  |
|
|
|
|
|
|
|
| Posted:
Sun May 02, 2010 11:20 pm
|
|
|
Joined: 28 Mar 2009
Posts: 31
Location: kansas city
|
|
Okay! I'm back home and I'll try to pick up where I left off.
The tool you see in the picture is one I had made by my machinist friend from a piece of Sheffield steel round stock. I had to look up the nominal bore of a 16 gauge and if I recall correctly, it was .662". I talked to the machinist and he suggested I take a direct measurement instead of relying on supposedly correct specifications. He loaned me a tool I know only as a snap gauge. It's like a little T shaped thing where one side of the top of the T is spring loaded. You insert it into the bore and turn the handle counter clockwise to release the spring tension and it pops out and puts pressure against the sides of the bore. Once you feel it is properly centered, you turn the handle the other way and it locks the T in place then you pull it out and measure across the T with calipers or a micrometer. The bore on my shotgun actually measured .667 so it's a little oversize I guess. We decided to make the tool to the nominal .662 which would give 2 1/2 thousandths clearance all the way around it. He also used a piece of hex shaft and made a sort of ramrod that I could use to tap it into place.
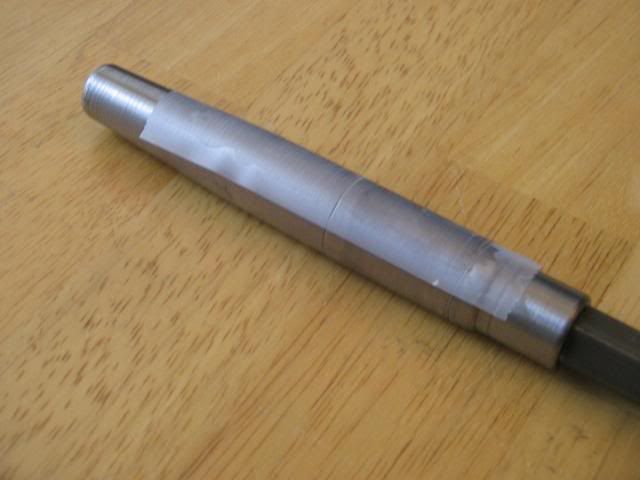
Here is a picture of the mandrel and the shaft. The threads are 3/8" fine.
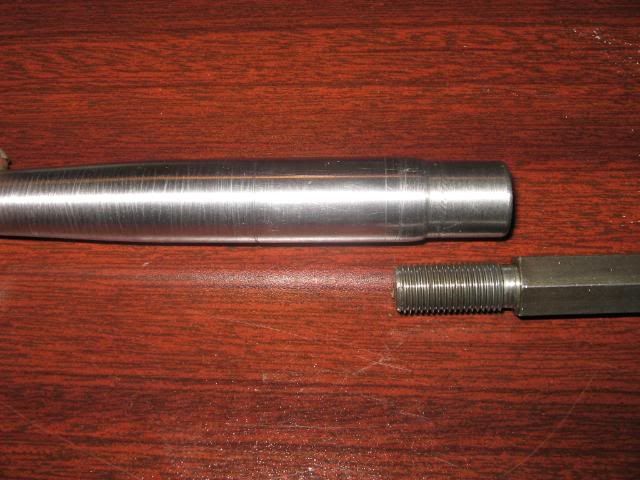
If you look closely at the mandrel you may be able to see a line around it about in the center. That is to mark the boundary of the .662 diameter untapered portion. The stepped part leads to a shoulder. There is about 1/4" of taper after the shoulder and then it is parallel from there to the line. After the line it tapers like the ogive of a bullet.. The front end has a 5/16" hole bored into it so that if it got stuck, I could insert a piece of 5/16" cold rolled steel from the muzzle and use it to tap the mandrel back out the other way.
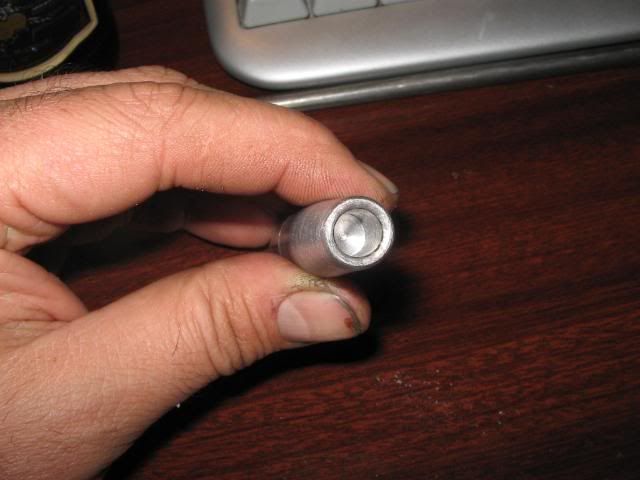
Here is a view from the front end.
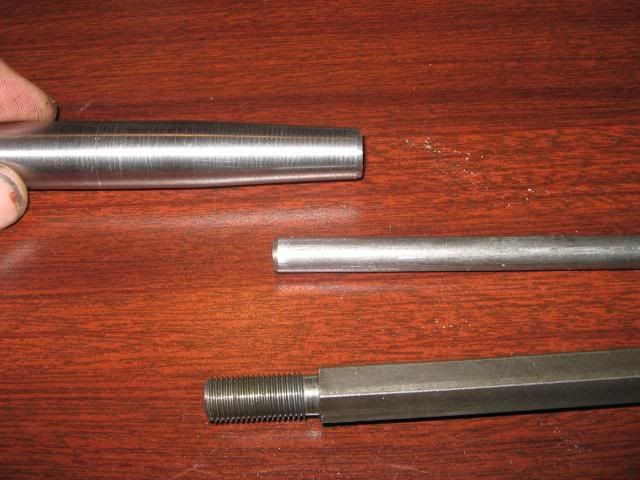
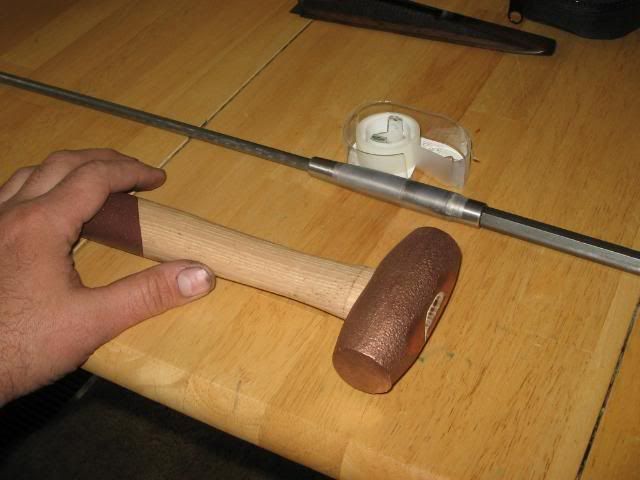
And here is the tool with both the threaded shaft and the 5/16" round stock piece. Notice also that on the hex shaft, there is a strong shoulder that is the primary bearing surface so as not to have to rely 100% on the threads.
|
|
|
|
|
|
|
|
| Posted:
Sun May 02, 2010 11:32 pm
|
|
|
Joined: 28 Mar 2009
Posts: 31
Location: kansas city
|
|
So, a simple fit test proved to me that the tool would slide down the bore with minimal binding and when it got to the first dent, it stopped. Just the fit I wanted.
Now, there is one more tool that I'll be using and that is a copper hammer. Copper or brass would both work but copper is softer by a good bit so that is my tool of choice.
Once the tool stopped at the first dent, I gently did a series of little woodpecker like taps on the side of the dent towards the fat part of the tool then pushed on the rod with my hand, tapped again etc. I repeated this several times then decided to use the hammer on the end of the hex shaft to give it some gentle taps. When it had moved about 1/2 inch I saw that most of the dent was gone. Cool! More tapping all around the dent and I could turn the tool with the shaft but it was still fairly firm. I pushed some more and felt the tool move down to the second dent and stop again. I repeated the process just as I did on the first dent and it too came most of the way out.
After removing the tool and giving the a barrels a wipe with a cleaning patch dampened with some Hoppes #9 here is what it looked like.
|
|
|
|
|
|
|
|
| Posted:
Sun May 02, 2010 11:48 pm
|
|
|
Joined: 28 Mar 2009
Posts: 31
Location: kansas city
|
|
So far so good eh?
Well, I figured I could get it better still. My original plan was to use some steel or brass shim stock to wrap the side of the mandrel opposite the dent and tighten it up and repeat. However, a lack of shim stock on hand and the advice of the machinist combined and I just used some scotch tape instead. One long piece that ran well into the tapered areas was tried.
The fit was snug but still a slip fit and again, the tool stopped at the dents. I repeated the initial process until the tool would move by hand through the formerly dented area. I pulled it out and added a second piece of tape and repeated yet another time.
This time the fit was even more snug and I had to use the 5/16 cold rolled round stock from the muzzle to tap it back out of position. I should have turned the 5/16 stock down a little on the end to get a slip fit in the front of the tool but I didn't . It got a little stuck in the front and the tool and both shafts came out like this. Once it was out, I realized that it wasn't really stuck, just that the rod and hole fit together really snug like a steel ferrule on a fishing rod. They come apart with a nice little pop. Oh and by the way, there is my copper hammer.
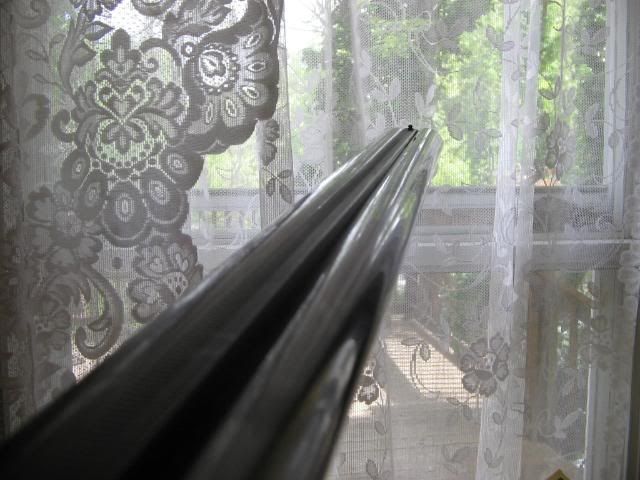
By now, I was pretty happy with the results. Here is a pic looking down the barrels with reflection on them trying to show if the dents are visible at all. I can't see them.
Next was a trip outside to check things in natural sunlight. This one is still in the shade and it looks real good.

Now here is the oddball pic. Once I got into natural sunlight, the spots showed up quite a bit.
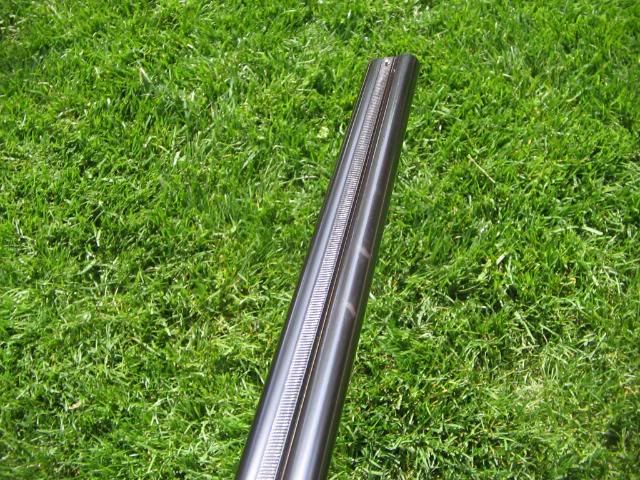
The only thing I can figure is that possibly the metal itself moving during the denting and the dent removal process may have done something to the blueing there. Sort of like if you painted a piece of metal and then bent it how the paint would crack and flake. I'm hoping this can be lessened with a bit of cold blue touch up.
So,
Whaddaya think?
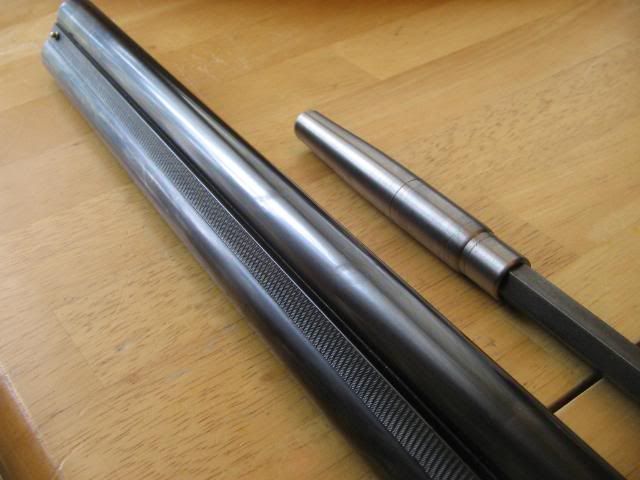
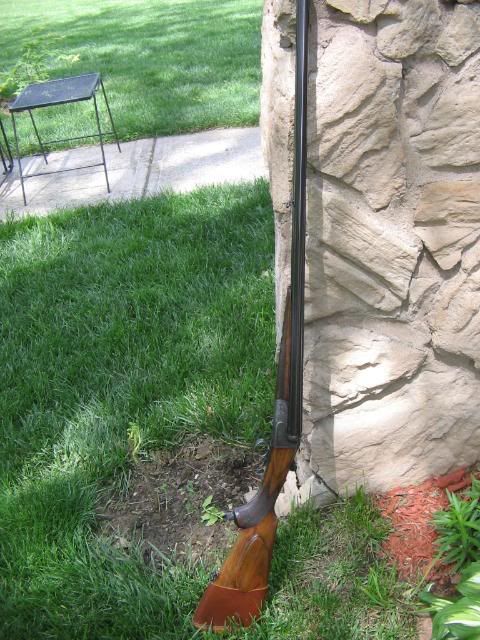
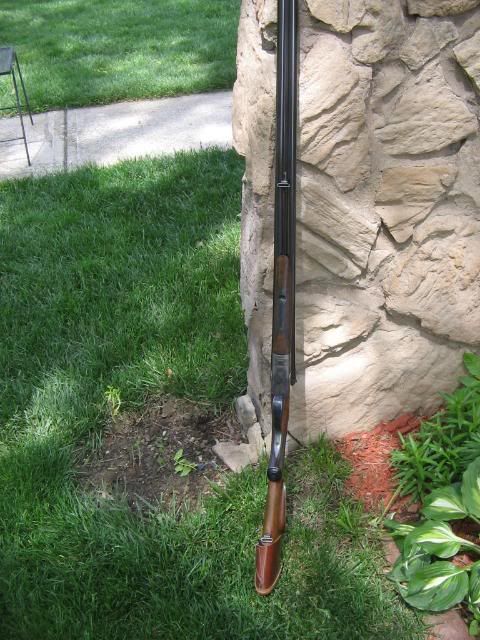
Oh, and lastly, I'll go ahead and throw up a couple pics of the whole gun just so you can see what it looks like overall.
Side view.
Bottom view.
|
Last edited by dave bulla on Tue May 04, 2010 6:49 am; edited 1 time in total |
|
|
|
|
|
|
| Posted:
Mon May 03, 2010 3:04 am
|
|
|
Joined: 15 Jan 2009
Posts: 728
|
|
| I think it looks great! I'm sure that all the bending and stretching of the steel affected the rust blue finish. I wouldn't mess with the finish because I don't think you'll get a good match wiith the cold blue but I'm no expert. I suppose if you could remove the cold blue relatively easily if you don't like the results it would be worth a try. |
|
|
|
|
|
|
|
| Posted:
Mon May 03, 2010 7:03 am
|
|
|
Member
Joined: 21 Jun 2009
Posts: 1285
Location: western n.y.
|
|
| I think you did a great job figureing out how they do it right . The finish part is another thing unto itself , but you got the best part right . IMO - you may find the dents trying to work back in as you shoot , the elasticity in the steel at work , but you know what to do if that occurs - great job ! I THINK INNIES ARE EASIER TO DEAL WITH THAN OUTTIES ! |
_________________
fins , feathers , furs and a loud Beagle howl - life's little treasures . bill & molly the beagle |
|
|
|
|
|
|
| Posted:
Mon May 03, 2010 7:24 am
|
|
|
Member
Joined: 12 Mar 2005
Posts: 6535
Location: massachusetts
|
|
| Nice job. goes to show that some basic intelligence and skill goes a long way. I think folks will need to learn to do repairs like these them selves more as time goers by. Liability issues are the reason most repair shops have stopped doing anything but basic parts replacements. Too many sharks in the water sniffing for blood. |
|
|
|
|
|
|
|
| Posted:
Mon May 03, 2010 7:40 am
|
|
|
Member
Joined: 16 Jan 2006
Posts: 1008
Location: Sandy Lake, PA
|
|
| Give OXPHO-BLUE from Brownells a try on those dent repaired spots. |
_________________
------------
Davy 03C&R FFL |
|
|
|
|
|
|
| Posted:
Mon May 03, 2010 10:20 am
|
|
|
Joined: 28 Mar 2009
Posts: 31
Location: kansas city
|
|
| Oxpho blue will be my first choice. I've used it before years ago and had real good results. |
|
|
|
|
|
|
|
| Posted:
Mon May 03, 2010 2:31 pm
|
|
|
Joined: 19 Jun 2004
Posts: 1480
Location: Mpls, MN.
|
|
Nice work. Be careful around that thrower.
Warm the steel slightly with a hairdryer before the Oxpho blue treatment.
Best,
Ted |
_________________
"Well sir, stupidity isn't technically against the law, and on that note, I'll remove the handcuffs and you are free to go". |
|
|
|
|
|
|
| Posted:
Mon May 03, 2010 2:36 pm
|
|
|
Joined: 29 Jan 2009
Posts: 207
|
|
The results would be great if done by a professional, with pro-grade tools. For a do-it-yourselfer, with one-off tools, it came out fabulously well! Congrats!
I've got Dicropan, also from Brownells; it works well, but... it matches some blues, and not others. I guess bluing is different from place to place, not much of a surprise there. Anyway, I'd suggest not leaving it on long before wiping off. Work up incrementally. |
|
|
|
|
|
|
|
| Posted:
Mon May 03, 2010 3:41 pm
|
|
|
Member
Joined: 15 Apr 2007
Posts: 9464
Location: Amarillo, Texas
|
|
Well done. well done
Thanks for the posts and pictures
Mike |
|
|
|
|
|
|
|
| Posted:
Mon May 03, 2010 4:22 pm
|
|
|
Joined: 04 Jun 2009
Posts: 827
Location: N. Shore, mn
|
|
| ya done great! |
_________________
I STAND WITH THE NRA! |
|
|
|
|
|
|
| Posted:
Tue May 04, 2010 7:39 pm
|
|
|
Member
Joined: 02 Feb 2006
Posts: 602
Location: western pa
|
|
| I've done something similar to fix some double gun muzzles with a tapered piece of brass but haven't attempted anything farther down the bore. Thanks for the info and photos, You are my inspiration to get 2 dings out of the middle of my Nitro barrel. Good idea with the extractor rod. By the way, that T shaped snap gauge is called a telescoping gauge. |
_________________
Always get get a drink upstream of the herd-Will Rogers |
|
|
|
|
|
|